Circuit Breaker/Cache
To start out I want to share a bit of an embarrassing story.
One night when I was on my mission in Argentina the lighting in our entire apartment just went out. As a couple of sister missionaries just barely out of their training we honestly had no idea what to do, and we were a bit scared on top of everything. We called the landlady and in the best Spanish we could muster asked her what we should do. She kept saying the word “llave” which at that time we both only understood meant “key”. (Like the key we used to get into our apartment) We spent forever in the dark trying so hard to find some magical key that would help us get the electricity working again. Seriously we were looking under the front mat, and in the windowsills and everything with no luck.
Luckily a member of the church who worked in construction lived only a couple blocks away so we called him frantically to see what we could do. Because he couldn’t come alone, he and his wife hauled their 3 little kids into the car to come check it out and see what was wrong. Once he got there he asked us what had happened, then looked around for a second. He stepped outside and by the door there was this little box that he opened up and flipped a switch. Immediately all the light came back on in our little apartment.
He said “Don’t worry sisters, when things like this happen you just need to flip the switch” I ran to grab my dictionary to look up the word “llave”. It was then that I realized that not only did “llave” mean “key” but another interpretation for it was also “switch”.
As they left we were embarrassed that they had had to bring their whole family to flip a silly little switch. (Our embarrassment was made even a little bit worse because earlier that week they had to come to help us a plumbing problem we had been having as well…oops!) :)
Anyways that switch that he flipped was a part of the Circuit Breaker. Because there had been an overload at some point the switch had automatically turned itself off to protect the circuit from damage.
For our purposes here the Circuit Breaker Pattern does a similar thing where it monitors your Web Service for failures and provides and alternate service or error message. Sometimes our Web Services have to call other Web Services for information. But what happens when one of those Web Services on our circuit fails? The whole system is going to be affected. By implementing this into your code you can better protect your Web Service from too many failures.
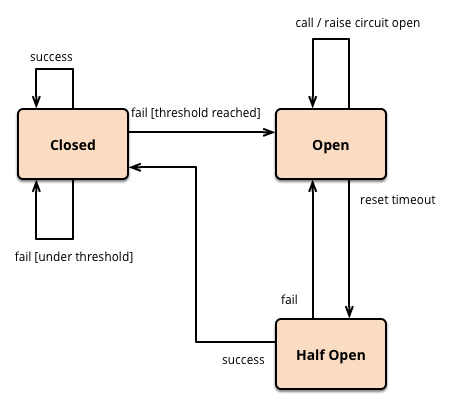
A Circuit Breaker has 3 different states:
Closed: Everything is normal, it stays closed and all your calls can pass through to the services. When it fails the breaker trips, and switches to Open.
Open: returns an error for calls without executing the function
Half-Open: After a timeout period, it switches to half-open to test if the problem still exists. If a call fails while it’s like this, the breaker is tripped again, but if it succeeds it is reset back to the normal closed state.
We’re also going to try to understand caching in this tutorial. As we use our Web Service to call another one, it can be really slow if we try to make that call every single time. Instead, once certain information has been called, we’d like to put it in a cache that is connected to our Web Service so that we don’t overrun the other Web Service making thousands of calls.
Read through the following documentations on scatter-gatherers, circuit-breakers, and caches:
https://www.npmjs.com/package/scatter-gather
https://www.npmjs.com/package/scatter-gather-circuit-breaker
https://martinfowler.com/bliki/CircuitBreaker.html
We need to understand what a scatter-gatherer is to get started. In our Web Service, it is very likely that we might be reaching out to another Web Service to get some information. However, authorizations sometimes between Web Services can get really hairy, so for that case we can use a Scatter-Gatherer. When an event is raised in one of our Web Services, the “gatherer” listens to know what was happening, and then the “scatterer” sends that info to other Web Services.
Now lets get started!
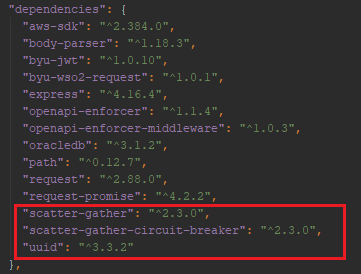
First we need to add some dependencies to our package.json file. To do this go to the terminal in your project and run:
npm i scatter-gather
npm i scatter-gather-circuit-breaker
npm i uuid (This is an npm module that helps secure the id’s that we are using)
This is how your package.json file should look after all these npm modules are downloaded. Keep in mind that the versions may be different on yours depending on updates that have been made.
Okay now that we have our dependencies down, we’re going to start a circuit-breaker file. To do this create a new directory in your project and name it circuit-breakers. After that you should create an index.js file. At the beginning of that we are going to declare some constants that will call some of the other parts of our code into this file.
First we need to require our circuit-breaker. We will also need to put the file for our controllers in there.

After we have gotten those in, we’re going to go ahead and start writing some of the code. We will be using the template from the npm scatter-gather-circuit-breaker documentation for writing it with caching if you need another source to look at, that should be helpful!
Before we start writing a ton, we’ll want to add the generateValidationResponseObj function to our code to use later on.

To start our Circuit-Breaker, we’re going to create a new constant that will create a new CircuitBreaker. We’ll start by writing some of the general parts. Some of the important parts of this are telling it how long we want it to try until we decide to shut it off, what the max amount of errors we want to take in are, and then how long after it’s been timed that we want it to start trying again. Those can be written with this configuration.
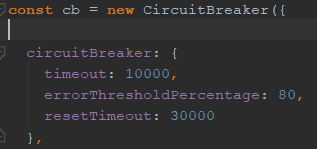
This is what each part does.
timeout: The time in milliseconds to wait for responses before throwing a timeout error
errorThresholdPercentage: The percent of responses that need to fail before the circuit breaker fails open.
resetTimeout: The time in milliseconds to wait when a circuit breaker fails open before trying again to talk to the API.
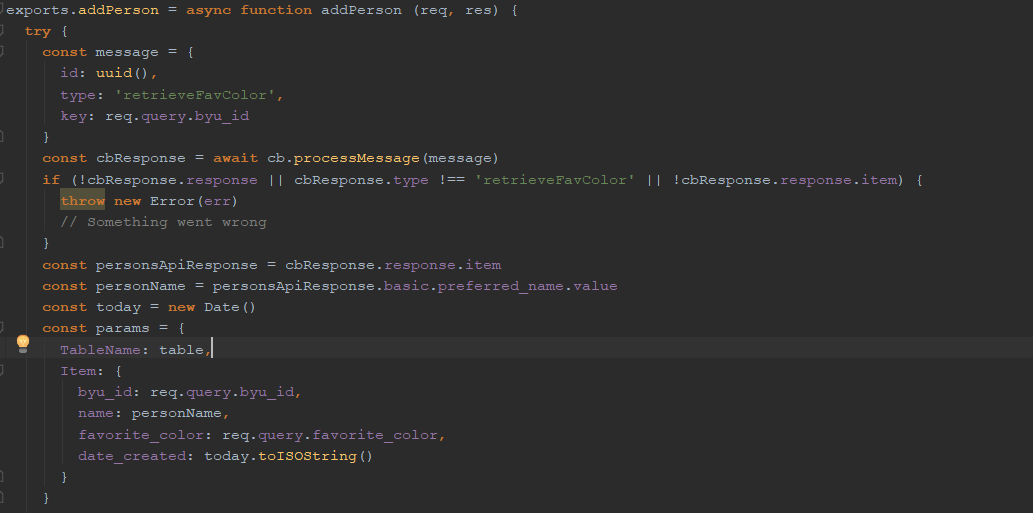
Now we need to write the phase, or the call that our circuit-breaker is going to be wrapping itself around. First we need to find out what API call we’re going to be sending to our circuit-breaker. To do this we look at our controller file “favoritecolor.js” and find which of our controllers is going to access a different Web Server. In our case that is the addPerson function because you’ll see that it uses the “callPersonsAPI” function which is the one that makes our API call to the Persons API.
While we’re here in the addPerson function lets go ahead an add our message into it. It’s going to need 3 parts. We’ll give it an id, a type, and a key.
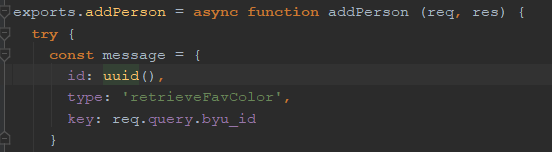
The id is the secure uuid we will pass into it with the module we downloaded. The type is a name that you will add so that we can stick to just passing through one specific message, while the key is the byuId that we’re going to be searching for.
We’ll also change the function so that instead of calling our API directly, it goes to our circuit breaker. Where it says “const response = await exports.callPersonsAPI(req) we’re going to change that so that the response is what we get back from our circuit breaker that we are also going to call instead of the PersonsAPI. You’ll also need to change the response from the personsApiResponse to calling the cbResponse.response.item
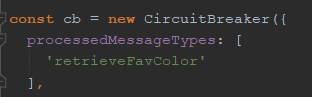
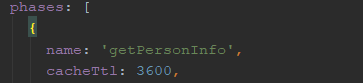
Back in our circuit-breaker file we’ll use this information for the function we’re going to write in the phase. But to start let’s give our phase a name. I called mine ‘getPersoninfo’ because that’s what the Persons API is going to be responding with. Then we’ll add an implementation of the function that we want to run using some of the information from before.

And because we don’t want it to get confused we’re going to add a part called “processedMessageTypes” That will make sure that it does the right message that we want it to process. Go ahead and put that right under where you declare the new circuit breaker.
Now that we have that we will configure it so we can use a cache. There is a good way to set this up where we’re going to need a few different parts. The most important part is our dynamo set up.
Lets start by making a new DynamoDB in our handel.yml file. It will look similar to the other one that we made, except that it needs one more key called the “sortkey”.

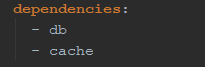
And don’t forget to add it into your dependencies in that same handel.yml file.
Now back in your circuit-breaker file you’ll need to require your table into your list of constants. I put this in as table2 because I don’t want it to get confused with the other table that is in our code.

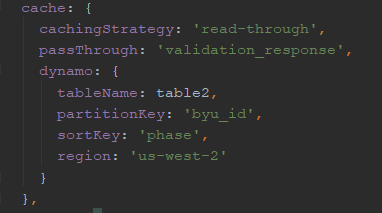
Then you’ll want to add this configuration under your circuit-breaker and before the phase. It will set up the cache so that it will save things into that new dynamoDB that you created.
Here are what the other parts mean:
- cachingStrategy: choose between ‘look-aside’, and ‘read-through’. ‘look-aside’ is the default.
- ‘look-aside’ calls both the cache and the api simultaneously and returns whichever returns first.
- ‘read-through’ calls the cache first and then the api if necessary.
- passThrough: if you want to only cache some responses and not others, specify a parameter that if found in the response, the response will not be cached.
Because we want to check to make sure something is in the cache before we make an unnecessary call to the API we are going to use ‘read-through’. And we don’t want to overload the cache with too much stuff, so we’re going to passThrough the validation_response.
Now in the phase, under the name you’ll need to add how long you want the information to be cached for. You can do that like this.
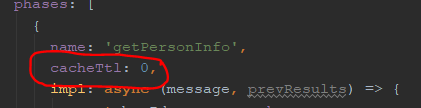
I put the 0 in there because it will cache it indefinitely. If you put other numbers in then it will cache it for that many seconds. For example if you put in “cacheTtl: 60,” then it would cache it for 60 seconds. (not milliseconds like it was for the threshold timeout).
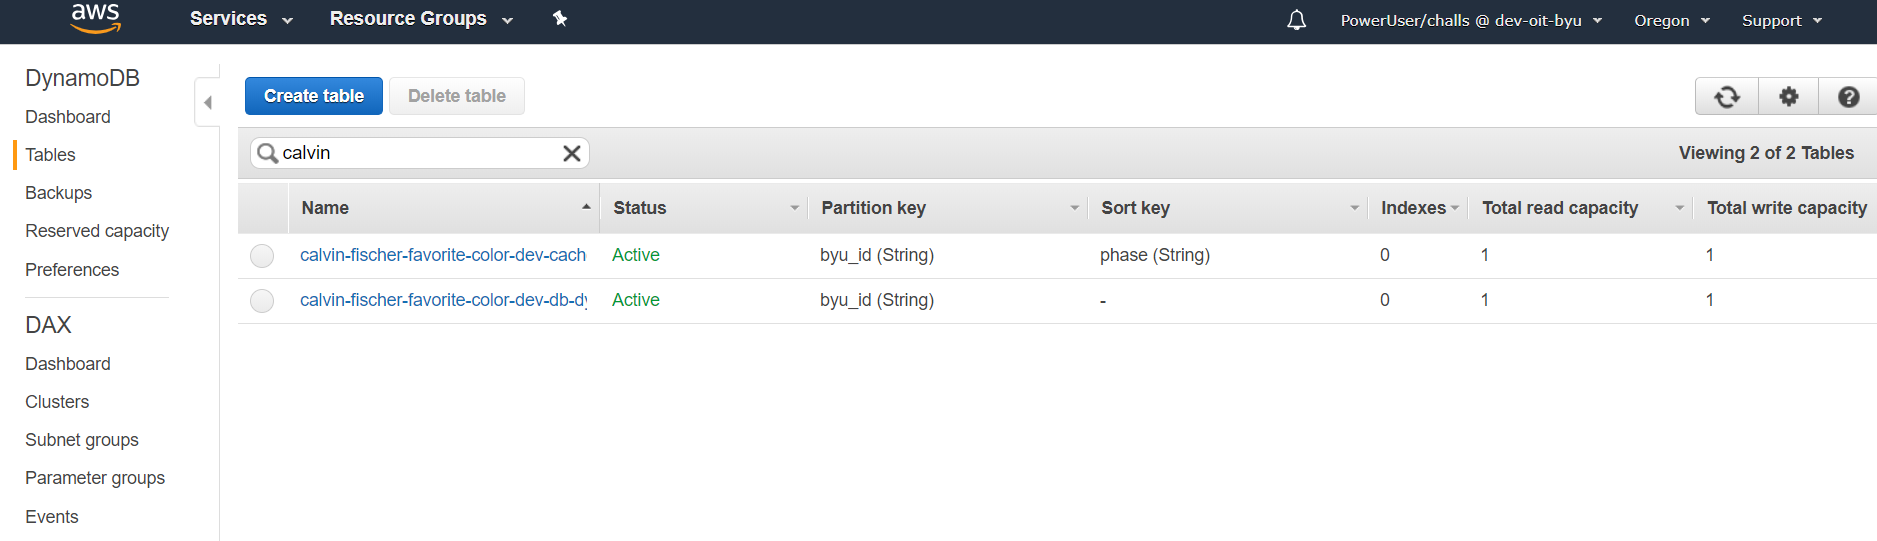
Push up just your handel.yml file and check to make sure that the cache was created. Once it gets through the deploy stage on your pipeline you should be able to look in DynamoDB for your new cache database.
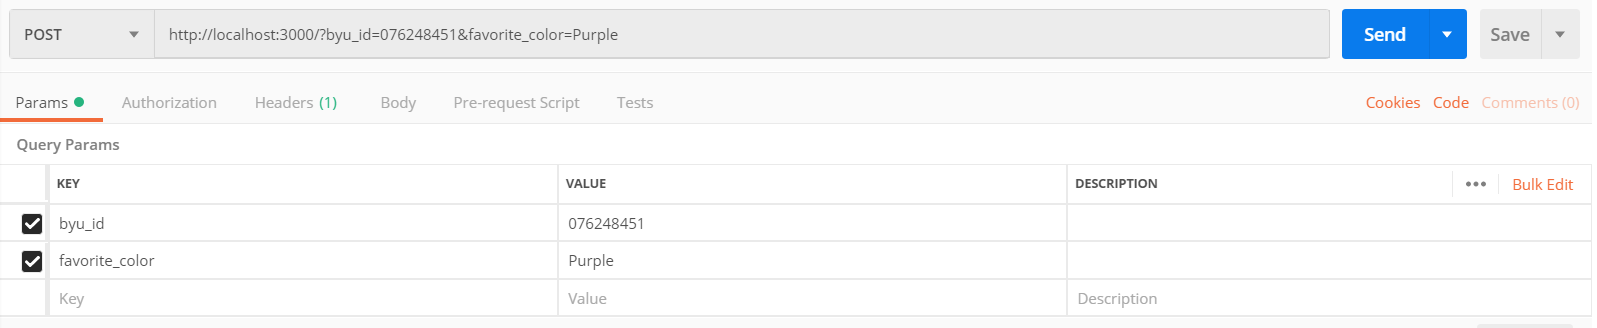
Now you can run tests locally on Postman to debug anything you might find. You’ll need to add a JWT as a header and the byu_id, and favorite_color as your parameters.
Headers:

Params:
Once you run a Post successfully it should appear here in the table under the items tab.
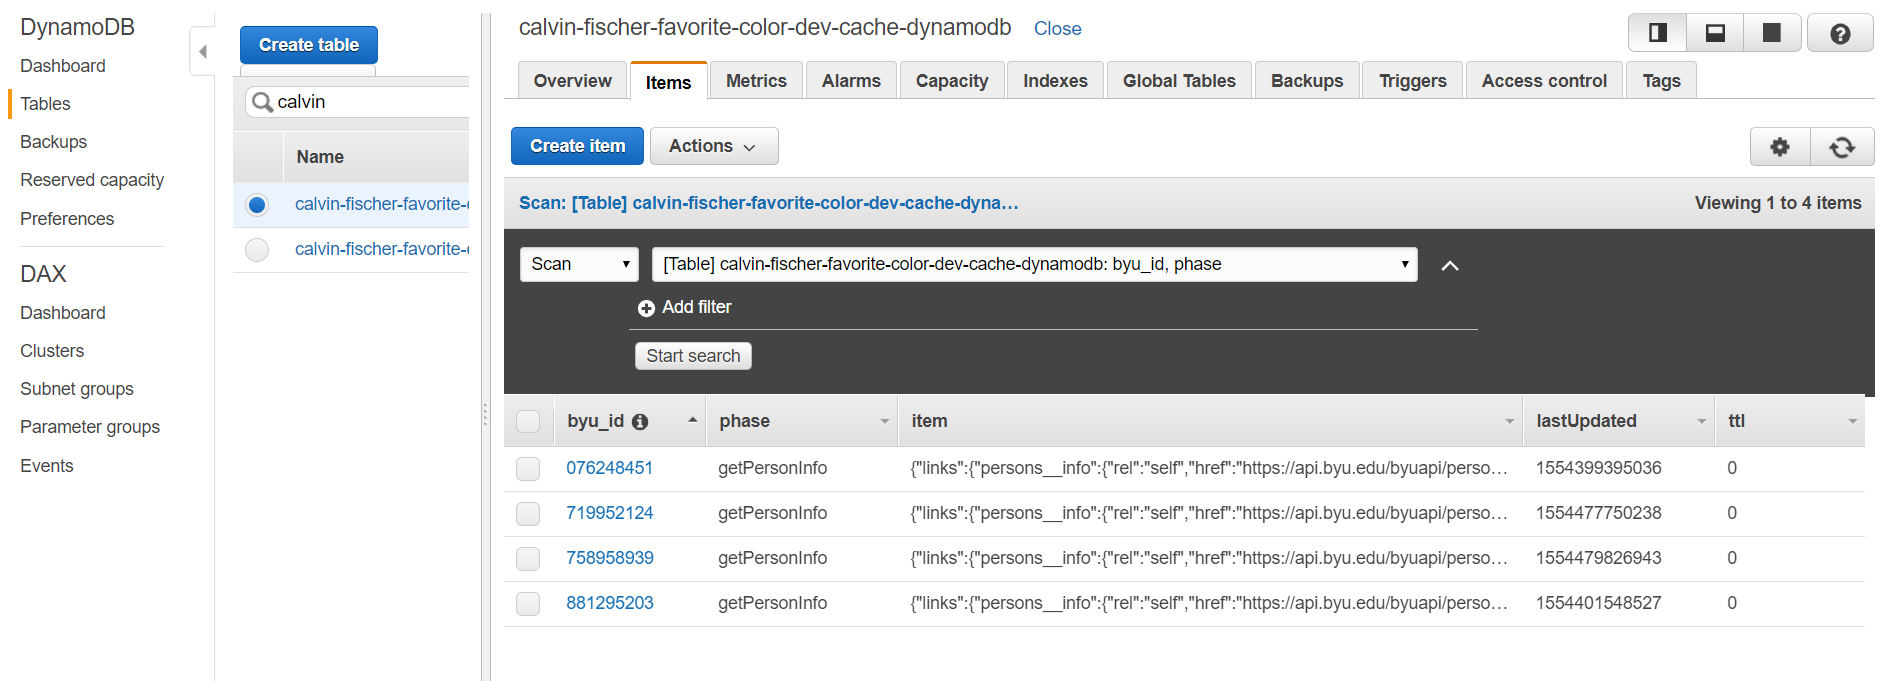
Congrats! It worked! And it saved the information in the cache! Since it’s passed all our tests we can go through and change our cacheTtl so it won’t cache it forever. I’d change it to maybe cache for 3600 seconds (that way it will cache for an hour).
Now you’ll want to push everything up through your pipeline, and check in Postman with your beanstalk url to make sure that you get the same responses!
